What is a Reverse Proxy?
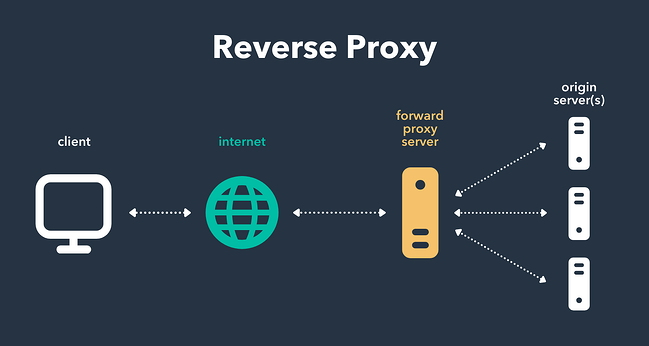
A standard proxy server works on behalf of clients, often by providing privacy or filtering content. A reverse proxy works on behalf of a server, intercepting traffic and routing it to a separate server.
If you have multiple servers, a reverse proxy can help balance loads between servers and improve performance. As a reverse proxy provides a single point of contact for clients, it can centralize logging and reporting across multiple servers.
The client and server exchange information continuously to work efficiently. Typically, reverse proxies are used by a web server. A reverse proxy or gateway appears to the client just like an ordinary web server, where no special configurations are necessary. The client makes ordinary requests while the reverse proxy decides where to pass on the information delivering the final output to the client as if it were the origin.
The Advantages of Using Nginx Reverse Proxy
why Nginx Reverse Proxy tool is so popular:
- It is simple to implement and provides the user with high-end security against Web server attacks such as DDoS and DoS
- Nginx Reverse proxy helps create a balanced load among several back-end servers and provides caching for a slower back-end server
- Nginx does not require setting up a new process for each web request from the client. Rather, the default configuration is to comprise one work process per CPU
- It can act as a reverse proxy server for various protocols such as HTTP, HTTPS, TCP, UDP, SMTP, IMAP, and POP3
- It can handle over 10000 connections with a low memory footprint. Nginx can operate multiple web servers via a single IP address and deliver each request to the right server within a LAN
- Nginx is one of the best web servers for improving the performance of static content. Additionally, it can also be helpful to serve cache content and perform SSL encryption to lower the load from the web server
- It can also be helpful when optimizing content by compressing it to boost the loading time
- Nginx can perform randomized experiments or A/B tests without placing JavaScript codes into pages.
How to Set Up an Nginx Reverse Proxy?
Now, we will configure Nginx in front of an Apache web server. We chose the Apache server because it’s better at handling dynamic content.
So, all the static content will go to Nginx, while the dynamic content goes to Apache. This will improve performance by optimizing the delivery of content based on the handling criteria.
Next, we will define the IP address of the Nginx Proxy Server as 192.x.x.1 and the back-end Apache server as 192.x.x.2. After setting up Apache, we can move on to these steps:
1. Install Nginx
We’ll be using the apt command on Ubuntu 18.04
sudo apt-get updatesudo apt-get install nginx2. Disable the Default Virtual Host
Once you have installed Nginx, follow the below command to disable the virtual host:
sudo unlink /etc/nginx/sites-enabled/default3. Create the Nginx Reverse Proxy
After disabling the virtual host, we need to create a file called reverse-proxy.conf within the /etc/nginx/sites-available directory to keep reverse proxy information.
For this, we should first access the directory using the cd command:
cd /etc/nginx/sites-available/Then we can create the file using the Nano command:
nano reverse-proxy.confIn the file we need to paste bellow content:
server {
        listen 80;
        proxy_set_header Host $host;
        proxy_set_header X-Real-IP $remote_addr;
        proxy_set_header X-Forwarded-For $proxy_add_x_forwarded_for;

        location / {
                proxy_pass http://192.x.x.2;
        }
}
In the above command, the considerable point is the proxy pass is allowing the requests coming through the Nginx reverse proxy to pass along to 192.x.x.2:80, which is Apache remote socket. Thus, both the web servers – Nginx and Apache shares the content.
Once completed, simply save the file and exit by pressing ctrl + x and then y.
To pass information to other servers, you can use the ngx_http_proxy_module in the terminal.
Now, activate the directives by linking to /sites-enabled/ using the following command:
sudo ln -s /etc/nginx/sites-available/reverse-proxy.conf /etc/nginx/sites-enabled/reverse-proxy.conf
4. Test Nginx and the Nginx Reverse Proxy
as final step, we need to run an Nginx configuration test and restart Nginx to check its performance. Type the below command to verify the Nginx functioning on the Linux terminal:
service nginx configtestservice nginx restartif you receive a failed test, that most likely indicates that Apache was not properly set up. please let us know in the comment section.